How to Make Dog Leashes And Collars: DIY Guide
Last Updated on September 9, 2024 by Petpalace54
Making dog leashes and collars requires some materials and sewing skills. You can follow DIY tutorials on YouTube or other websites to learn how to make your own dog collar using fabric scraps and nylon webbing, or a simple leather dog collar and lead.
For the leash, you can learn how to make one out of fabric, rope, or nylon webbing. It’s also essential to use the right thread for the collar and choose the right size for your dog. By making your own dog leash and collar, you can customize it to your dog’s personality and save some money in the process.
Table of Contents
Materials Needed
To make a DIY dog leash and collar, you will need materials like fabric, straps, buckles, D-rings, interfacing, and nylon thread. First, measure and cut the materials to size. Then, sew and assemble the pieces together, adjust the collar to fit your dog, and you have a personalized leash and collar for your furry friend.
List Of Tools And Materials
If you are looking to make your dog’s leash and collar and want to know what tools and materials you need, then you are in the right place. Making your dog’s leash and collar yourself can be a fun and rewarding project that saves you money and provides an entirely unique collar and leash to your furry friend.Here is a list of tools and materials that you will need to make your dog’s leash and collar:For the Dog Collar
- Webbing
- Buckle
- D-ring
- Thread
- Scissors
- Sewing machine or needle
- Measuring tape
- Lighter or matches
- Interfacing (optional)
For the Dog Leash
- Webbing
- D-ring
- Bolt snap (or clasp)
- Thread
- Scissors
- Sewing machine or needle
- Measuring tape
- Lighter or matches
- Interfacing (optional)

Credit: www.pinterest.com
Diy Dog Collar
Learn how to make your own DIY dog collar with just a few materials and easy steps! From sewing the fabric onto the strap to attaching the buckle and D-ring, you can create a custom collar that fits your pup perfectly.
Don’t forget to adjust the collar to fit your furry friend before you’re finished.
Instructions For Making A Custom Dog Collar Using Fabric Scraps And Nylon Webbing
If you want to create a personalized dog collar on a budget, then you can use fabric scraps and nylon webbing. First, measure your dog’s neck to determine the length of the webbing you will need. Cut the webbing with scissors and attach it to the fabric by sewing along the edges. You can add any embellishments to the fabric, such as embroidery or vinyl, before sewing it onto the webbing. Finally, attach the D-ring and buckle to complete your DIY dog collar.Sewing A Personalized Dog Collar
Sewing a customized dog collar can be a fun and rewarding activity, especially if you have sewing skills. First, choose a durable and comfortable material, such as faux leather or cotton webbing. Then, measure your dog’s neck and add an inch to the length for the collar’s webbing. Cut the webbing, and sew the fabric of your choice around it as per your preference. Next, add a buckle and D-ring, and your personalized dog collar is ready!Creating A Dog Collar Sewing Pattern
If you want to make a custom dog collar but don’t have a pattern, you can create one. Start by measuring your dog’s neck and cut a piece of paper to size. Fold the paper in half, lengthwise, marking the center point and cut the outline of a collar shape, adding seam allowance of ¼ inch all around. Once you have a pattern, you can use it to create a collar using different materials, add embellishments, and make a unique-looking collar for your furry friend.In conclusion, making your dog’s collar using fabric scraps and nylon webbing, personalizing collars using different materials, or creating a sewing pattern doesn’t have to be tricky. Using the methods mentioned above, making a collar for your furry friend will be a fun and exciting DIY project.Diy Dog Leash
Learn how to make a DIY dog leash out of fabric with this easy tutorial! From covering the strap with fabric to attaching the handle, this step-by-step guide includes everything you need to know to create your own custom leash for your furry friend.
DIY Dog LeashMaking your own dog leash not only saves you money but gives you the freedom to create a customized leash that meets your dog’s needs. Whether you want to make a simple leather dog collar or a fabric dog leash, this guide will walk you through the process of creating your own leash.How to Make a Dog Leash Out of FabricMaterials:– 2-inch nylon webbing – Fabric of your choice – D-ring – Swivel snap – Sewing machine – Thread and needle – Scissors – RulerInstructions:1. Cut a length of nylon webbing to the desired size of your leash.2. Cut your fabric to the same length as the nylon webbing and twice the width.3. Fold the fabric in half lengthwise and sew the long edge and one short edge together, leaving one short edge open.4. Turn the fabric right side out and slide it onto the nylon webbing.5. Sew the two short ends of the fabric together, enclosing the nylon webbing inside.6. Sew the D-ring onto one end of the leash and the swivel snap onto the other end.7. For added durability, sew around the perimeter of the fabric.Making a Simple Leather Dog Collar and LeadMaterials:– Leather strip – Swivel snap – Leather hole punch – Rivets – Hammer – Dye or leather finishInstructions:1. Cut your leather strip to the desired length and width of your collar.2. Cut two smaller leather strips for the strap and handle.3. Use the leather hole punch to make a hole in the center of the collar and at the ends for the rivets.4. Insert the rivets and use the hammer to secure them in place.5. Attach the swivel snap to one end of the collar using a rivet.6. Sew the smaller leather strips to the collar to create a handle and strap.7. Finish the collar with dye or a leather finish for added protection.Making Your Own Dog LeashMaterials:– Nylon webbing – Swivel snap – D-ring – Sewing machine – Thread and needle – Scissors – RulerInstructions:1. Cut a length of nylon webbing to the desired size of your leash.2. Sew the swivel snap onto one end of the webbing.3. Fold the other end of the webbing over and sew the D-ring onto it.4. For added durability, sew around the perimeter of the webbing.How to Make a Homemade Dog LeashMaterials:– Rope or cord – Bolt snap – Heat shrink tubingInstructions:1. Cut your rope or cord to the desired length of your leash.2. Slide the bolt snap onto one end of the rope.3. Tie a knot on the other end of the rope to create a handle.4. Cut a piece of heat shrink tubing and slide it over the knot.5. Use a lighter or heat gun to shrink the tubing and secure the knot in place.Conclusion:Making your own dog leash or collar allows you to create a customized leash that meets your dog’s needs and allows you to express your creativity. With these simple steps, you can make a fabric dog leash, a leather dog collar and lead, or a rope dog leash that is both functional and stylish. Now, it’s time to get started on your DIY project!Step-by-step Guide To Making A Dog Collar
Learn how to make a dog collar with this step-by-step guide that covers everything you need to know to create a custom collar for your furry friend. From choosing the right materials to sewing and assembly, this tutorial will help you create a unique and stylish accessory for your dog.
Step-by-Step Guide to Making a Dog CollarAre you tired of purchasing expensive dog collars that just don’t fit your furry friend’s personality? Why not take matters into your own hands? Making your own dog collar is not only cost-effective but also allows you to personalize the collar to your pup’s unique style. In this step-by-step guide, we’ll walk you through the process of making your own dog collar using simple materials that you can find at your local craft store.Cutting the Rope and Creating a Knot for the Clasp SideThe first step in making a dog collar is to cut your rope to your desired length. Ensure that the rope is thick enough to hold your pup’s weight. To create a compact knot for the clasp side of the collar, follow these simple steps:1. Fold the rope in half and create a small loop on one side. 2. Wrap the longer end of the rope around the loop at least two times. 3. Pull the longer end of the rope through the loop. 4. Pull both ends of the rope until the knot is tight.Cutting Heat Shrink and Securing itHeat shrink provides your dog collar with a professional look and also protects it from wear and tear. To attach the heat shrink on the rope:1. Cut a small piece of heat shrink and slide it onto one end of the rope. 2. Use a lighter to heat the shrink until it wraps around the rope. 3. Repeat this process on the other end of the rope.Creating and Securing the HandleTo create the handle of your dog collar, follow these steps:1. Cut a piece of nylon webbing to your desired length, ensuring that it’s long enough to create a handle. 2. Place the rope on top of the nylon webbing. 3. Sew the nylon webbing onto the rope, ensuring that it’s securely in place. 4. Fold the nylon webbing in half, creating a handle. 5. Sew the two ends of the nylon webbing together, securing the handle in place.Now that you’ve learned how to make a DIY dog collar, you can create as many collars as you want for your furry friend. Making your own dog collar is not only fun but also enhances the bond between you and your pet. Give it a try and see the joy it brings to you and your pup.Step-by-step Guide To Making A Dog Leash
Learn how to make a dog leash step by step with these DIY tutorials on YouTube and blogs. From fabric leashes to leather collars and leads, you can customize your pet’s gear to fit their style and needs. Get creative and try making your own dog leash today!
Making your own dog leash can be a fun project that not only saves money but allows for customization to your pet’s personality. Follow this step-by-step guide to make a strong and stylish dog leash.Covering The Strap With Fabric
- Cut a strip of fabric that is 1 inch longer than the length of your leash and 3-4 inches wide.
- Cover the strap entirely with the fabric using fabric glue or by sewing the edges together.
- Let the fabric dry and bond to the strap before moving on to the next step.
Attaching The Fabric To The Strap
- Using fabric glue or a sewing machine, attach the covered fabric to the strap.
- Secure the fabric to the strap by sewing the edges together or by using fabric glue.
Sewing The Strap
- Sew the edges of the strap together using a sewing machine or a needle and thread.
- Ensure that the seam is strong and securely holds the edges together.
Attaching The Bolt Strap And Creating A Handle
- Attach the bolt snap to the end of the leash using a needle and thread.
- Fold over the end of the leash to create a loop for the handle.
- Sew the loop together to create a handle for the leash.
Attaching The Handle
- Sew the handle to the leash, ensuring that it is securely attached.
- Test the leash to ensure it is strong, durable, and comfortable to hold.

Credit: m.youtube.com
Choosing The Right Thread For A Dog Collar
Finding the right thread for a dog collar is crucial in ensuring its durability and strength. Using nylon thread is a good choice for its resilience and resistance to wear and tear, making it ideal for creating sturdy and reliable dog collars.
materials needed to make your own dog collar, check out our previous blog post. But once you have all the pieces ready, choosing the right thread is crucial to ensure a durable and safe collar for your furry friend. Let’s take a look at an overview of nylon thread, which is commonly used for dog collars.Overview Of Nylon Thread
Nylon thread is a popular choice for dog collars due to its strength and durability. It is a synthetic thread made from nylon filaments that are woven together to create a strong and smooth thread. Nylon thread is resistant to abrasion, chemicals, and UV rays, which means it can withstand wear and tear from daily use and outdoor activities.When selecting nylon thread for your dog collar, make sure to choose a thread that matches the strength and weight of your collar’s material. For example, if you are using a heavy-duty webbing material for your collar, choose a thick nylon thread with a high tensile strength.Some other things to consider when choosing nylon thread for your dog collar include the color, thickness, and finish of the thread. You want to choose a thread that matches the color of your collar and is thick enough to withstand the weight and force of your dog. Additionally, consider the finish of the thread – a matte finish will be less reflective than a glossy finish, which can help avoid irritating your dog’s eyes.By selecting the right nylon thread for your dog collar, you can ensure a safe and durable product that your furry friend can enjoy for years to come.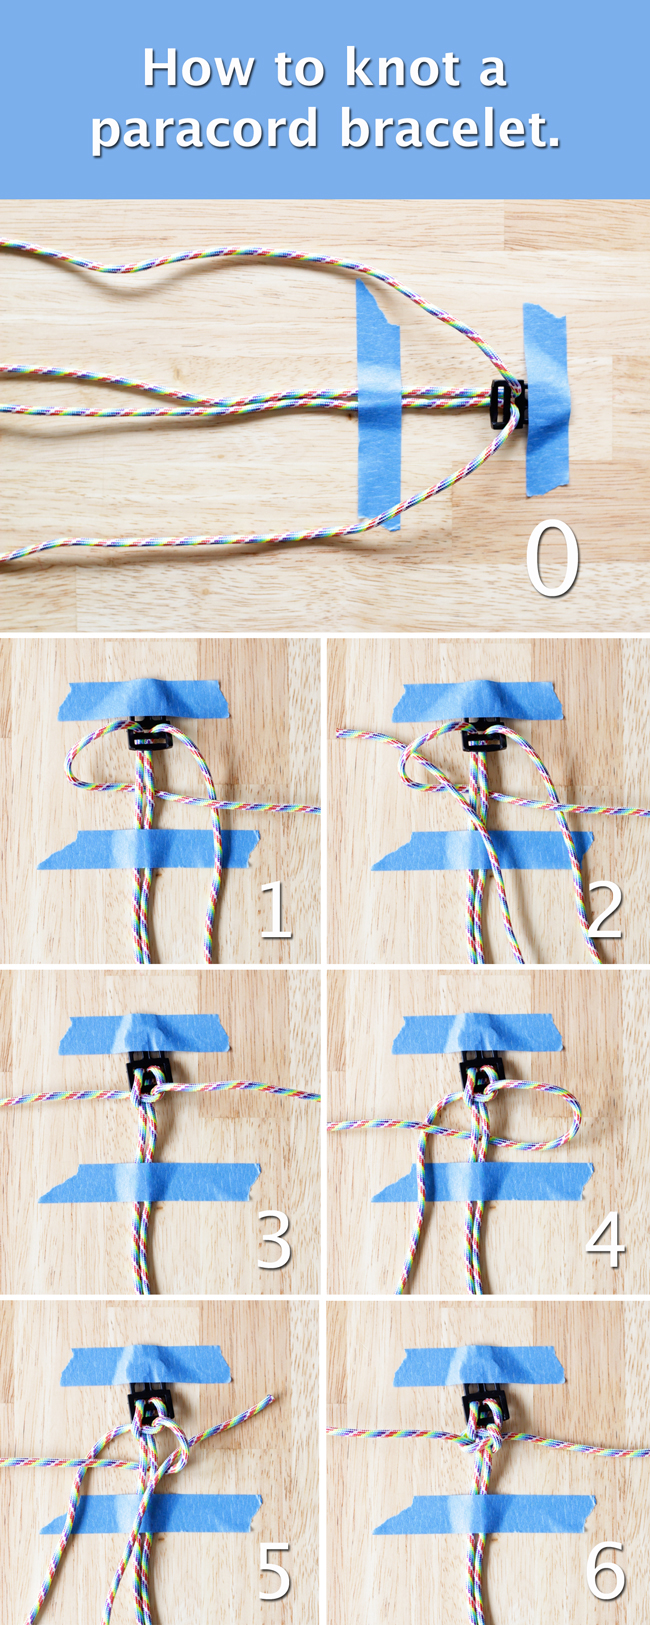
Credit: www.handsoccupied.com
Frequently Asked Questions For How To Make Dog Leashes And Collars
How Do You Make A Homemade Dog Leash?
To make a homemade dog leash, start by cutting your rope to the desired length. Next, tie a compact knot for the clasp side of the leash and secure it with heat shrink. Create a handle for the other end of the leash and secure it.
You can also use fabric scraps and nylon webbing to make a DIY dog collar.
How Do You Make A Homemade Dog Cone Collar?
To make a homemade dog cone collar, you can follow DIY videos available on YouTube that demonstrate how to create a DIY dog collar using fabric scraps and nylon webbing. You can also find instructions on how to make your own custom dog collar and leash, using materials such as leather or cotton fabric.
Additionally, you can make a simple dog leash at home, by cutting the rope to the desired length and knotting it tightly.
What Thread To Use For Dog Collar?
The best thread to use for a dog collar is Nylon Thread.
How Do You Make A Nylon Webbing Dog Collar?
To make a nylon webbing dog collar, you can use fabric scraps and nylon webbing. After cutting the fabric to the desired length, sew it onto the webbing before assembling the collar. Then, sew the straps together, attach the D-ring and other side of the buckle, and adjust the collar to fit your pup.
Alternatively, you can make a homemade dog collar using rope, heat shrink, and a knot. Use nylon thread to sew the collar.
Conclusion
Congratulations, now you know how to make your own dog leashes and collars! Not only is this a fun DIY project, but it also allows you to customize your pet’s accessories to fit their personality and style. By following the step-by-step instructions and utilizing the necessary materials, you are able to create a unique collar and leash that’s a perfect fit for your furry friend.
Not to mention, it’s a great way to save money and avoid purchasing overpriced pet accessories. With these DIY skills, you and your pooch can strut your stuff in style everywhere you go!

